Baking a cake is an art. It’s an expression of creativity, love, and a tantalizing journey for the taste buds. Brown Derby Cake, a classic delight, exemplifies the wonders that can be achieved in the realm of baking.
In this blog, I will share with you a Brown Derby Cake Recipe That will tantalize your taste buds and leave you wanting more.
But let me tell you, the process is no cakewalk (pun intended). It’s a meticulous dance of flavours and textures that will put your skills to the test.
Why You’ll Adore Brown Derby Cake
Mouth Watering Taste: Indulgence is the name of the game with this recipe. Picture a luscious chocolate sponge layered with velvety caramel filling, topped with a cascade of toasted nuts.
Nostalgic Bliss: Brown Derby Cake carries a nostalgic aura that harkens back to simpler times. It’s the cake your grandmother lovingly baked for special occasions, infusing each slice with cherished memories.
Good Looking: This cake isn’t just a feast for the taste buds; it’s a visual masterpiece. The intricate layers, complemented by a glossy chocolate glaze, create an aesthetic marvel that will leave your guests in awe.
What You Need for Brown Derby Cake
For The Chocolate Cake
- Cocoa powder = 1 cup
- All-purpose flour = 1 and 1/2 cups
- Baking powder = 1/2 teaspoon
- Salt = 1/4 teaspoon
- Butter (softened) = 8 ounces
- Granulated sugar = 2 and 1/4 cups
- Eggs = 5
- Buttermilk = 6 ounces
- Vanilla extract = 1 Tablespoon
For The Whipped cream filling and frosting
- Heavy cream = 2 cups
- Confectioners sugar = 1/4 cup
- Gelatin mixture or 1/2 teaspoon of cream of tartar instead
For The Filling
Strawberries (hulled and sliced)
Canned peaches (drained)
banana sliced = 1
Steps Involved in Making Brown Derby Cake
For The Cake:
- Preheat your oven to a toasty 350°F (175°C).
- In your trusty electric mixer, blend the butter and sugar until creamy. While the butter works its magic, sift the cocoa powder, flour, baking powder, and salt into a medium-sized bowl. Set it aside, ready to join the mix.
- Crack open those eggs, one by one, into the butter mixture. Follow up by adding half of the dry ingredients. Give it a good whirl.
- Pour in half of the buttermilk, followed by the rest of the dry ingredients. Finally, add the remaining buttermilk and the enticing vanilla extract.
- Time to bake! Grab three 8-inch round pans (or adjust to three 10-inch pans if you prefer). Pop them into the oven for around 35 minutes, or until the centre springs back to life. Adapt the baking time accordingly if you’ve made size adjustments.
For The Whipped Cream Filling And Frosting
- Optional: If gelatin is your jam, let’s “bloom” 1 tablespoon of gelatin in 1/4 cup of cold water for a cozy 5 minutes.
- While the gelatin does its thing, whip that cream like a pro using a stand mixer or a trusty handheld one. Gradually add the confectioners’ sugar and cream of tartar (if you fancy) until you reach those stiff peaks we all admire.
- For those using gelatin, gently melt 1 tablespoon of the bloomed mixture in the microwave on low for a quick 10 seconds. Add this velvety concoction to the whipped cream to give it that extra stability. (No gelatin? No worries, just skip this step and continue with confidence.)
For The Cake:
- Start the grand assembly by placing one layer of tantalizing chocolate cake on a beautiful cake pedestal or a trusty cake board.
- Time to build a delightful whipped cream “wall” around the cake’s circumference. Do this twice, creating two lovely layers of whipped cream goodness. Any piping tip will work its magic.
- Nestle peaches, strawberries, and bananas inside the cake, filling it with a burst of fruity bliss.
- It’s pyramid time! Add more whipped cream on top of the cake, shaping it into a captivating pyramid-like structure.
- Take the second layer of cake and crumble it into delightful small crumbs. Set these irresistible crumbs aside. (Alternatively, use the second layer of cake, whipped cream, and fruit filling, and crumble the third layer instead.)
- Now, for an optional twist: Grab that final layer of cake and cut a Pac-Man-like wedge from it. Fold this Pac-Man layer into a charming cone and set it atop the cake. (If you’re running low on whipped cream, feel free to skip this step. Instead, crumble this layer and use it as the cake’s exterior crumb coating.)
- Using an offset spatula, gently smooth out the luscious whipped cream, ensuring a dreamy consistency all around the cake’s top and sides.
- Seeking a perfectly smooth surface? Grab a parchment paper, skillfully cut into a triangle shape, and in one swift motion, glide it from the bottom to the top of the cake and over to the other side. (If you prefer, you can omit this step and revel in the cake’s natural beauty.)
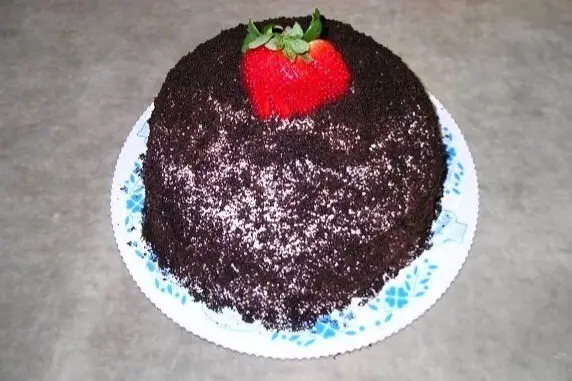
- Sprinkle those delectable cake crumbs over the entire cake, and if your heart desires, garnish with additional strawberries for an extra touch of fruity enchantment.
Recipe Tips
- Sift the dry ingredients for a smoother texture.
- Use room temperature ingredients for better incorporation.
- Drizzle caramel sauce generously between the layers for an extra indulgent touch.
- Toast the nuts before adding them as a garnish for enhanced flavour and crunch.
FAQs (Frequently Asked Flourishes)
Can I use a different type of nut for the topping?
Absolutely! Get creative and experiment with your favourite nuts or a combination thereof.
Can I make this cake in advance?
Yes! Prepare the cake layers ahead of time and assemble them just before serving for optimal freshness.
Concluding Remarks
Brown Derby Cake is a testament to the artistry of baking. It’s a journey that requires precision, but the rewards are beyond measure. So, don your apron, grab your mixing bowls, and let your culinary prowess shine as you create a cake that will be remembered for years to come. Get ready to savour every blissful bite of this nostalgic masterpiece. Happy baking!
More Amazing Recipes
- How To Reheat Chick Fil A Sandwich
- Does Frozen Meat Weigh More Than Thawed Meat?
- Buca Di Beppo Baked Ziti Recipe
- Paula Deen White Chocolate Bread Pudding Recipe
Brown Derby Cake Recipe
Ingredients
For The Chocolate Cake
- 1 cup Cocoa powder
- 1 and 1/2 cups All-purpose flour
- 1/2 teaspoon Baking powder
- 1/4 teaspoon Salt
- 8 ounces Butter (softened)
- 2 and 1/4 cups Granulated sugar
- 5 Eggs
- 6 ounces Buttermilk
- 1 Tablespoon Vanilla extract
For The Whipped cream filling and frosting
- 2 cups Heavy cream
- 1/4 cup Confectioners sugar
- 1/2 teaspoon Gelatin mixture or cream of tartar instead
For The Filling
- Strawberries (hulled and sliced)
- Canned peaches (drained)
- 1 Banana sliced
Instructions
For The Cake:
- Preheat your oven to a toasty 350°F (175°C).
- In your trusty electric mixer, blend the butter and sugar until creamy. While the butter works its magic, sift the cocoa powder, flour, baking powder, and salt into a medium-sized bowl. Set it aside, ready to join the mix.
- Crack open those eggs, one by one, into the butter mixture. Follow up by adding half of the dry ingredients. Give it a good whirl.
- Pour in half of the buttermilk, followed by the rest of the dry ingredients. Finally, add the remaining buttermilk and the enticing vanilla extract.
- Time to bake! Grab three 8-inch round pans (or adjust to three 10-inch pans if you prefer). Pop them into the oven for around 35 minutes, or until the centre springs back to life. Adapt the baking time accordingly if you've made size adjustments.
For The Whipped Cream Filling And Frosting
- Optional: If gelatin is your jam, let's "bloom" 1 tablespoon of gelatin in 1/4 cup of cold water for a cozy 5 minutes.
- While the gelatin does its thing, whip that cream like a pro using a stand mixer or a trusty handheld one. Gradually add the confectioners' sugar and cream of tartar (if you fancy) until you reach those stiff peaks we all admire.
- For those using gelatin, gently melt 1 tablespoon of the bloomed mixture in the microwave on low for a quick 10 seconds. Add this velvety concoction to the whipped cream to give it that extra stability. (No gelatin? No worries, just skip this step and continue with confidence.)
For The Cake:
- Start the grand assembly by placing one layer of tantalizing chocolate cake on a beautiful cake pedestal or a trusty cake board.
- Time to build a delightful whipped cream "wall" around the cake's circumference. Do this twice, creating two lovely layers of whipped cream goodness. Any piping tip will work its magic.
- Nestle peaches, strawberries, and bananas inside the cake, filling it with a burst of fruity bliss.
- It's pyramid time! Add more whipped cream on top of the cake, shaping it into a captivating pyramid-like structure.
- Take the second layer of cake and crumble it into delightful small crumbs. Set these irresistible crumbs aside. (Alternatively, use the second layer of cake, whipped cream, and fruit filling, and crumble the third layer instead.)
- Now, for an optional twist: Grab that final layer of cake and cut a Pac-Man-like wedge from it. Fold this Pac-Man layer into a charming cone and set it atop the cake. (If you're running low on whipped cream, feel free to skip this step. Instead, crumble this layer and use it as the cake's exterior crumb coating.)
- Using an offset spatula, gently smooth out the luscious whipped cream, ensuring a dreamy consistency all around the cake's top and sides.
- Seeking a perfectly smooth surface? Grab a parchment paper, skillfully cut into a triangle shape, and in one swift motion, glide it from the bottom to the top of the cake and over to the other side. (If you prefer, you can omit this step and revel in the cake's natural beauty.)
- Sprinkle those delectable cake crumbs over the entire cake, and if your heart desires, garnish with additional strawberries for an extra touch of fruity enchantment.
Notes
- Sift the dry ingredients for a smoother texture.
- Use room temperature ingredients for better incorporation.
- Drizzle caramel sauce generously between the layers for an extra indulgent touch.
- Toast the nuts before adding them as a garnish for enhanced flavour and crunch.







Leave a Reply